 Zapisz
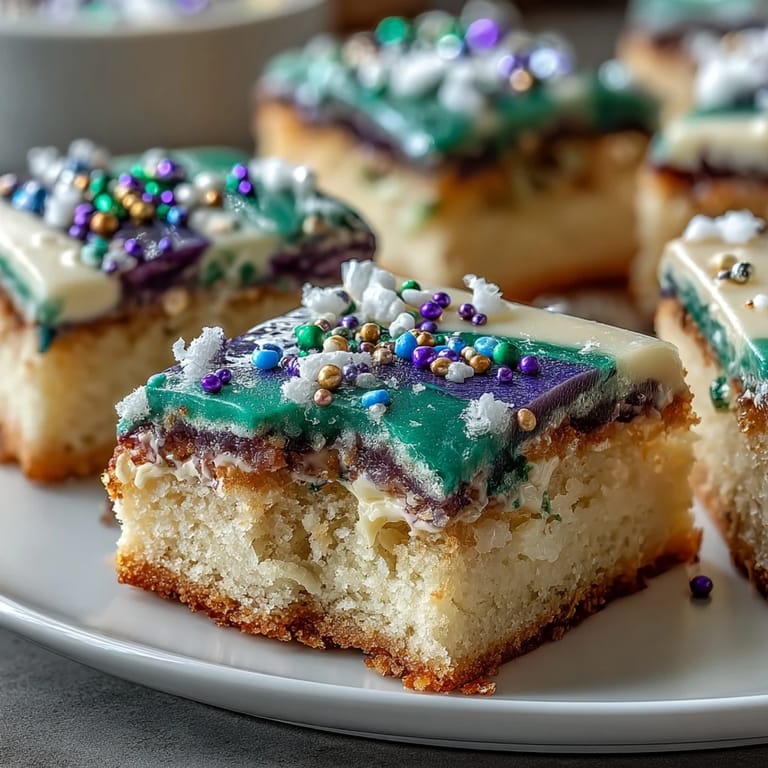
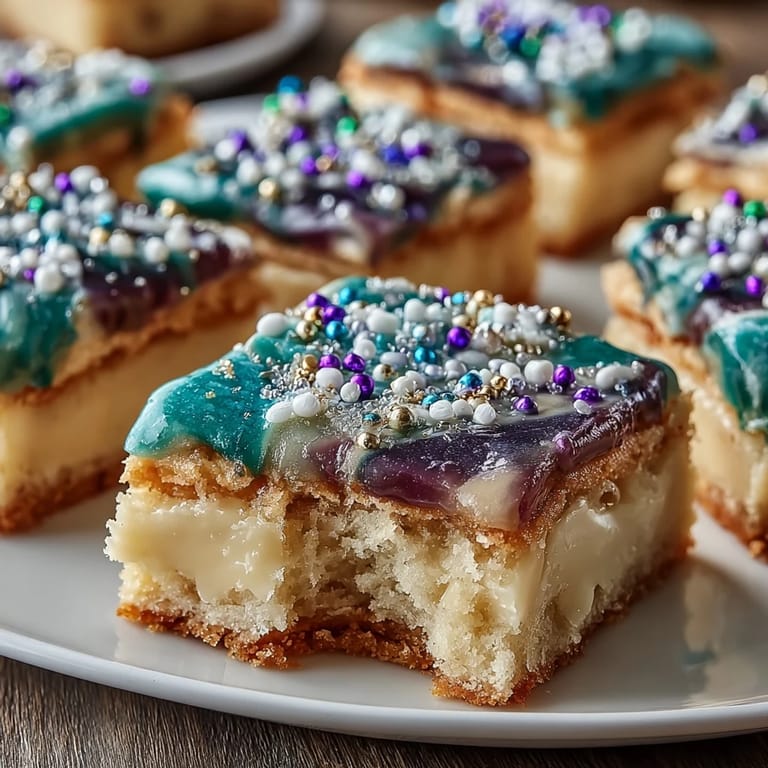
 The first time I made these King Cake sugar cookie bars, I wasn't actually planning to—I'd bought ingredients for traditional round King Cakes but realized my oven was acting temperamental that morning. So I improvised with a sheet pan instead, and something magical happened when those vibrant purples, greens, and golds hit the warm icing. My kitchen suddenly felt like a little corner of New Orleans, even though I was nowhere near Louisiana.
I brought these to a Mardi Gras gathering last February, and my friend Maria bit into one and immediately closed her eyes like she was tasting something from her childhood. Turns out her grandmother used to make King Cakes with that exact lemon-almond combination, and for the rest of the night, Maria kept coming back for another piece while telling stories I'd never heard before. It's funny how food can unlock someone's memories like that.
Ingredients
- Unsalted butter, softened (1 cup): Room temperature butter creams so much easier and incorporates air better than cold butter, which is what gives these their tender, cake-like texture instead of a dense cookie vibe.
- Granulated sugar (1 1/4 cups): The standard amount you see everywhere, but don't skip creaming it with the butter for those full 2-3 minutes—that's where the fluffy magic happens.
- Large eggs (2): I learned the hard way that room temperature eggs blend in smoother than cold ones straight from the fridge, giving you a better emulsion.
- Vanilla extract (2 teaspoons): Use the real stuff if you can; it tastes noticeably warmer and more complex than the imitation version.
- Almond extract (1/2 teaspoon, optional): This is optional but honestly, it's what makes people stop mid-chew and ask what they're tasting—don't skip it unless someone at your party has tree nut allergies.
- All-purpose flour (2 1/2 cups): Measure by spooning flour into your measuring cup and leveling it off; scooping directly from the bag packs in too much and makes everything dry.
- Baking powder (1/2 teaspoon): This is your secret weapon for getting that tender, delicate crumb instead of a dense, heavy bar.
- Salt (1/2 teaspoon): Even a tiny amount makes the sweetness pop and brings out the subtle flavors underneath.
- Ground cinnamon (1/4 teaspoon): Just a whisper of this, barely detectable, adds depth without announcing itself.
- Lemon zest (from 1 lemon): Use a microplane or the smallest holes on your box grater; this brightens everything and is honestly the standout flavor that makes these different from basic sugar cookies.
- Powdered sugar (2 cups): Sift it if it's lumpy, or whisk it well before mixing into the icing so you don't get grainy spots.
- Milk (2–3 tablespoons): Add it slowly because you want the icing to be spreadable but not runny; if you go overboard, you can't really fix it.
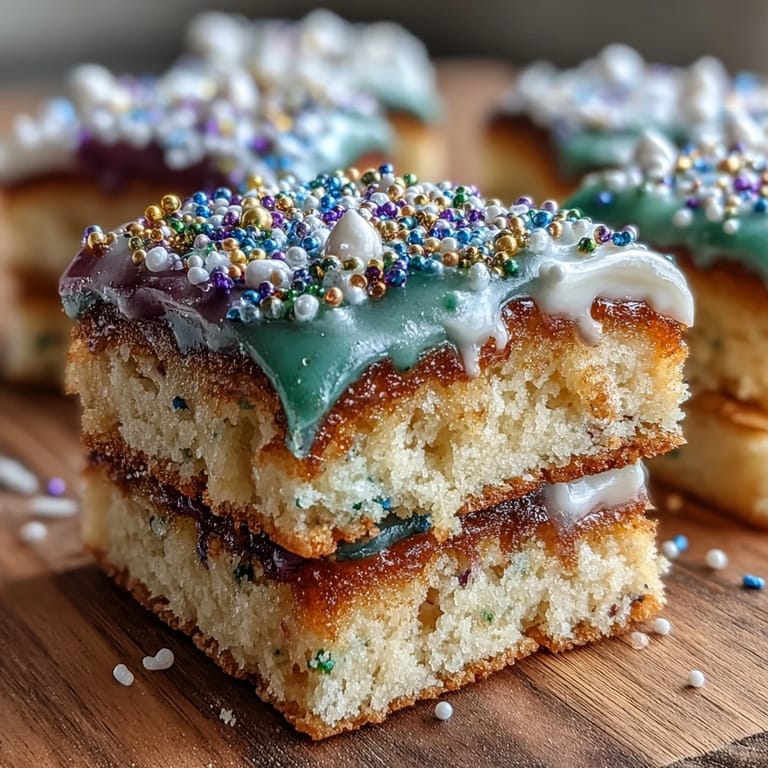
- Purple, green, and gold sanding sugar or sprinkles: The sanding sugar sticks better to wet icing than regular sprinkles do, and the colors stay vibrant without bleeding.
Tired of Takeout? 🥡
Get 10 meals you can make faster than delivery arrives. Seriously.
One email. No spam. Unsubscribe anytime.
Instructions
- Set up your space:
- Preheat your oven to 350°F and line that 9x13-inch pan with parchment paper, letting it hang over the edges—this is the one trick that makes sliding these bars out later actually effortless instead of a frustrating battle.
- Cream the butter and sugar:
- Beat them together for 2-3 minutes until the mixture looks pale and fluffy, almost like whipped frosting; this isn't just for show, it's where air gets incorporated and makes everything tender. You'll actually see the color change, which is satisfying to watch.
- Add eggs and flavorings:
- Drop in one egg, let it fully incorporate, then add the second one the same way; this prevents curdling and gives you a smoother batter. Pour in the vanilla, almond extract, and lemon zest, and mix until everything smells incredible.
- Combine dry ingredients separately:
- Whisk together the flour, baking powder, salt, and cinnamon in another bowl so everything's evenly distributed before it hits the wet mixture. This step takes literally one minute but prevents little pockets of baking powder from showing up in the final bars.
- Bring everything together gently:
- Pour the dry ingredients into the wet ingredients and stir just until combined—once you don't see streaks of flour, you're done. Overmixing at this stage creates tough, dense bars instead of the tender ones you're after.
- Spread and bake:
- Use a spatula or offset knife to spread the dough evenly across the prepared pan, getting into the corners without squishing out all the air you just incorporated. Bake for 22-25 minutes until the edges turn light golden but the center still feels barely set—this is crucial because the residual heat keeps cooking it even as it cools.
- Cool completely:
- Let the bars sit in the pan on a wire rack until they're totally cool; this matters because if you ice them while warm, the icing will melt and slide around instead of setting prettily.
- Make the icing:
- Whisk powdered sugar, milk, and vanilla together until you have something pourable but not too thin—it should coat a spoon but still flow when you tilt the bowl. Start with 2 tablespoons of milk and add more if needed, because humidity affects how much you'll actually need.
- Ice and decorate:
- Spread the icing evenly over the cooled bars, then immediately—and I mean immediately—sprinkle on your purple, green, and gold sugar in whatever pattern makes you happy. If you wait too long, the icing starts setting and the sugar won't stick as nicely.
- Let it set:
- Give the icing about 30 minutes to firm up before you slice into bars; if you rush this, the icing will crack and the bars will fall apart as you cut. This is the perfect time to clean up your kitchen or just admire your work.
 Zapisz
 What stuck with me most wasn't the party itself, but the quiet moment the next morning when I pulled a leftover bar from the container and sat down with my coffee. The icing had settled into the cookie overnight, creating this almost cake-like texture, and suddenly I understood why people make these traditions stick around year after year.
When You Should Make These
These are obviously perfect for Mardi Gras season, but honestly, they work for any excuse to gather people around a table—office parties, bake sales, casual Sunday get-togethers. I've made them in February and I've made them in May just because I was craving that specific combination of flavors, and they always feel a little bit celebratory, which is kind of the whole point.
The Hidden Baby Tradition
If you're going traditional with the hidden baby (that plastic trinket in the original King Cake), you can definitely slip one into one of these bars before the icing sets, though I usually skip this with a sheet pan version since it's a bit awkward. Some people hide a whole almond instead, which feels slightly more elegant and less like a choking hazard to explain to nervous guests. Either way, you absolutely have to tell people before they bite in, because nothing kills a party mood faster than someone thinking they've broken a tooth.
- The baby tradition dates back to Epiphany celebrations and is supposed to bring good luck to whoever gets it.
- If you do hide something, place it in the icing layer rather than inside the cookie base so it's visible enough that people can feel it before biting.
- Make sure whatever you hide is food-safe and large enough that it can't accidentally be swallowed.
Storage and Make-Ahead Tips
These actually taste even better the next day once the flavors have settled and melded together, so don't hesitate to make them a day or two ahead. Store them in an airtight container at room temperature, and they'll stay fresh and bright-tasting for up to three days, though honestly they rarely make it that long in my house. If you want to prepare ahead but not decorate until closer to serving time, you can bake and cool the bars, store them undecorated, and then ice and sprinkle them just a few hours before people arrive.
 Zapisz
 These bars are the kind of recipe that sneaks into your rotation and somehow becomes a go-to whenever you need something festive but manageable. Once you make them once, you'll know exactly how they should look and taste, and then the real magic starts—making them your own.
Najczęściej zadawane pytania dotyczące przepisów
- → Jakie składniki nadają barwę posypce?
Posypka wykorzystuje barwione cukry w kolorach fioletowym, zielonym i złotym, które tworzą charakterystyczny element dekoracyjny.
- → Czy można schować niespodziankę w ciastach?
Tak, tradycyjnie w jednym z kawałków ukrywa się plastikową figurkę lub migdał, co jest zabawną atrakcją podczas podawania.
- → Jaki aromat dodaje się do ciasta?
Dzięki dodatkom waniliowego i migdałowego ekstraktu oraz skórce cytryny ciasto ma wyrazisty i przyjemny aromat.
- → Jak przygotować lukier na ciasto?
Lukier powstaje przez wymieszanie cukru pudru z mlekiem i wanilią, aż do uzyskania gładkiej, łatwej do rozprowadzenia konsystencji.
- → Ile czasu potrzeba na upieczenie i ostudzenie podstawy?
Ciasto piecze się około 22-25 minut, a po wyjęciu z piekarnika należy je dokładnie wystudzić na kratce przed nałożeniem lukru.