 Zapisz
 There's something about making cake pops that turns an ordinary afternoon into pure magic—I discovered this while stress-baking the night before my roommate's birthday party, armed with nothing but a box mix and wild ambitions. The moment I realized I could swirl galaxy colors into white chocolate and call it "Pisces-themed" felt like I'd cracked some secret code in the dessert world. What started as a desperate rescue mission became the most enchanting thing I'd made in years, and watching her face light up when she bit into that shimmering, dreamy sphere made every sticky finger worth it.
I made a batch for my nephew's school fundraiser bake sale, and a girl came back asking if they were "actually edible or just decorative." When she took a bite and her whole expression softened, I realized these little orbs had somehow crossed that invisible line between pretty and delicious. Her mother bought six more, which felt like the highest compliment I could receive in a gymnasium filled with mediocre brownies and stale cookies.
Ingredients
- Vanilla cake mix: Use a quality box mix or bake from scratch if you're feeling ambitious—the crumb texture matters more than you'd think, so avoid anything too dense.
- Unsalted butter: Softening it properly means the frosting won't be grainy, which I learned after one regrettable attempt with cold butter.
- Powdered sugar: Don't skip sifting it if you have lumps, or your frosting will have weird grains that feel gritty on your tongue.
- Milk: Use whole milk if you have it—the richness makes the frosting bind better with the cake crumbs.
- Vanilla extract: Pure vanilla is worth the cost here because you taste it in every bite.
- White chocolate or candy melts: Candy melts are genuinely easier to work with for beginners because they don't require tempering, though white chocolate tastes better if you're patient.
- Gel food coloring: Liquid coloring will make your chocolate seize up, so gel is non-negotiable—navy, purple, teal, and black create that dreamy Pisces galaxy effect.
- Edible glitter: The shimmer is what makes these feel special, so don't cheap out on the quality.
- Lollipop sticks: Having extras is smart because some inevitably snap or bend.
Tired of Takeout? 🥡
Get 10 meals you can make faster than delivery arrives. Seriously.
One email. No spam. Unsubscribe anytime.
Instructions
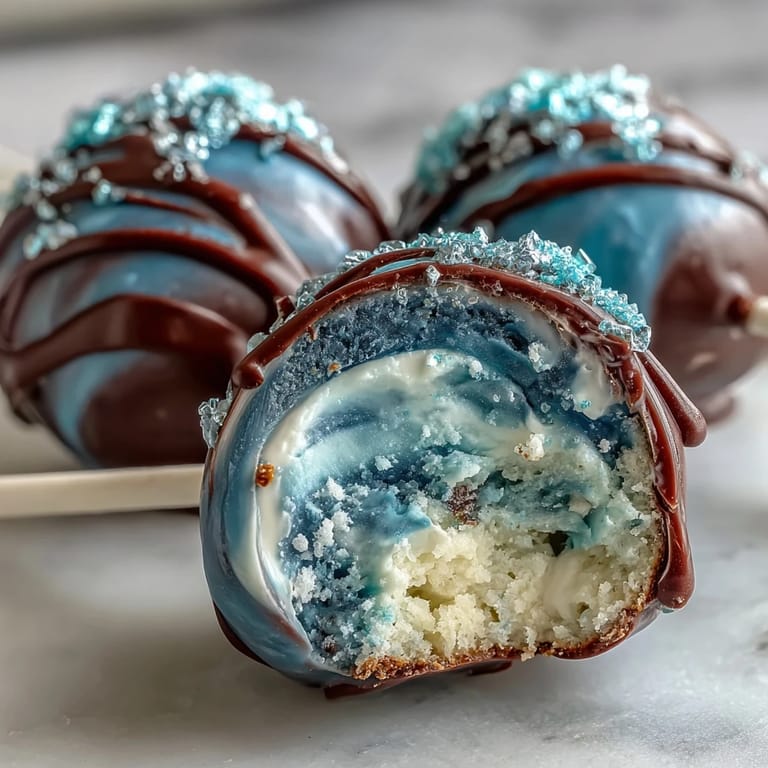
- Bake and cool the cake:
- Follow your cake mix instructions and let it cool completely—warm cake will be impossible to crumble evenly. This is the one step where patience actually pays off immediately.
- Crumble into submission:
- Your cake should be reduced to fine, even crumbs, almost like wet sand. If you end up with chunks, your finished cake pops will have weird structural issues that bother you every time you bite into one.
- Make the frosting:
- Beat the softened butter until it's pale and fluffy, which takes about 2 minutes with a mixer. Add everything else gradually and beat until completely smooth—the texture should be cloud-like.
- Combine cake and frosting:
- Add frosting to crumbs slowly because you might not need all of it, and too much makes the mixture sticky and impossible to roll. It should hold together when you squeeze it but still feel slightly crumbly.
- Roll and chill:
- Roll into 1.5-inch balls with your hands and arrange on parchment paper, then refrigerate for at least an hour so they hold their shape when you dip them. Cold cake pops are non-negotiable—warm ones will slide off the sticks like they're rejecting you.
- Melt the chocolate:
- Use 30-second bursts in the microwave and stir between each one to avoid scorching, which creates little burnt specks that ruin the whole vibe. Smooth, glossy chocolate is what you're after here.
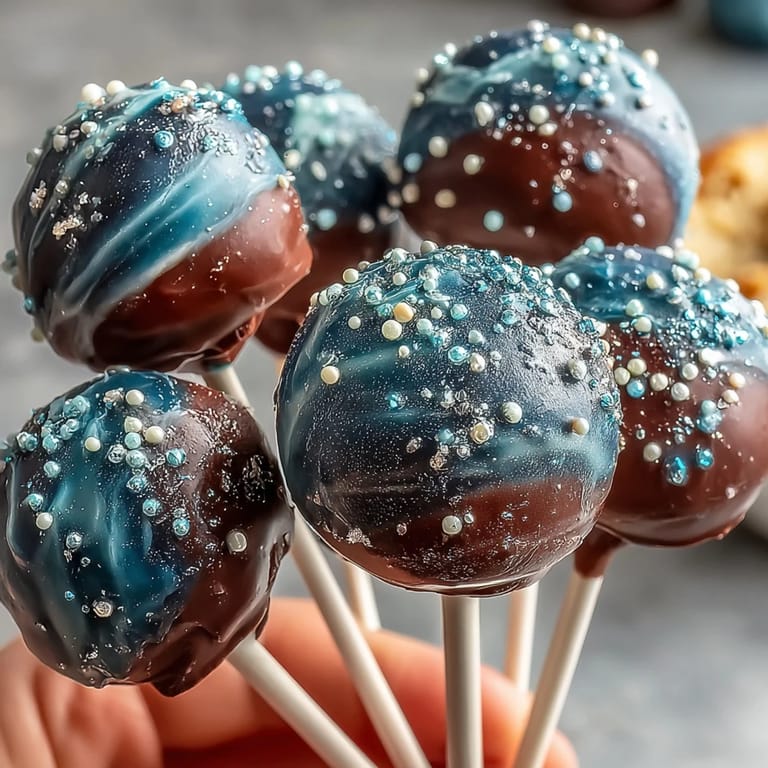
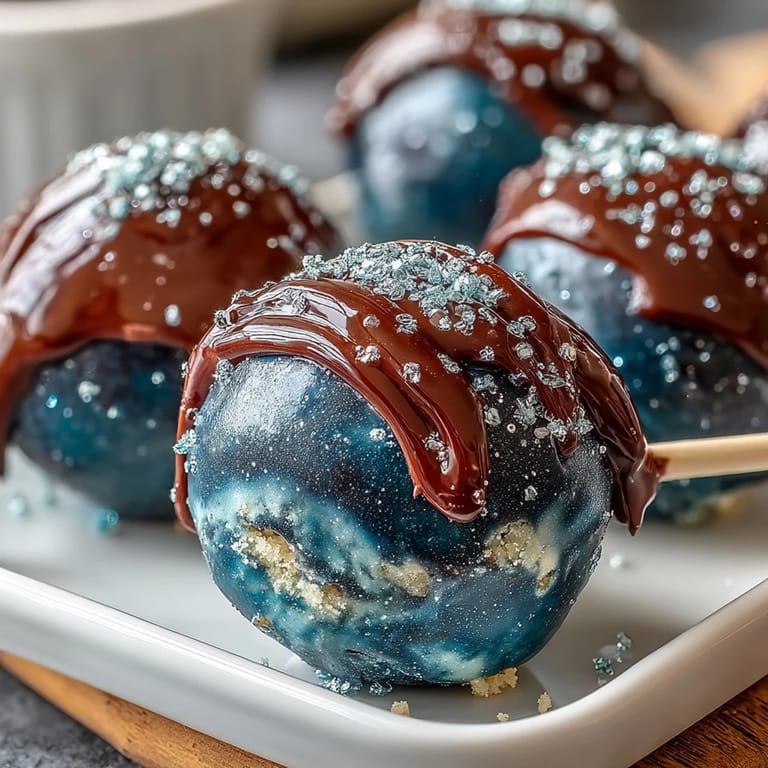
- Create your galaxy palette:
- Divide melted chocolate into bowls and add gel coloring drop by drop, stirring until you get those dreamy Pisces colors—navy and purple are essential, teal adds magic, pink brings softness. Black is optional but makes the effect more dramatic.
- Insert the sticks:
- Dip each stick's tip in melted chocolate first, then push it halfway into a cake pop—this adhesive step prevents sticks from spinning loose. Wait a few seconds for the chocolate to set before moving on.
- Dip with intention:
- Lower each pop gently into colored chocolate and rotate slowly to coat, letting excess drip back into the bowl. The swirling motion is what creates that galaxy effect, so don't be shy about rotating them.
- Set them upright:
- Place each pop into a styrofoam block or stand immediately while the chocolate is still wet. If you leave them sitting in your hand, the chocolate will crack as it cools unevenly.
- Glitter while warm:
- Sprinkle edible glitter and optional sugar pearls onto the still-tacky chocolate coating so they actually stick. This is the moment where they transform from decent to absolutely magical.
- Final set:
- Let them cure at room temperature for a few hours or in the fridge for 30 minutes—fully set pops should feel firm to the touch with no soft spots.
 Zapisz
 There's a moment when you're holding a finished cake pop up to the light and the edible glitter catches the sun just right—suddenly you're not looking at dessert anymore, you're holding a tiny edible galaxy. That's when you know you've made something that matters, even if it's gone in three bites.
The Pisces Zodiac Connection
Making these cake pops galaxy-themed for Pisces feels intentional because that zodiac sign is all about dreams, intuition, and fluidity—qualities that chocolate swirls capture beautifully. The colors themselves tell a story: deep blues for the ocean depths where Pisces lives, purples for mysticism and imagination, teals for that magical in-between space where reality blurs into fantasy. I started adding fish-shaped sprinkles or tiny Pisces symbols drawn with melted chocolate on top, which turned these from pretty treats into actual tributes to the sign's dreamy nature.
Flavor Variations That Actually Work
The vanilla base is intentionally neutral because it lets the chocolate and glitter be the stars, but you can absolutely experiment once you've made them once. I've added orange extract to the frosting for a subtle citrus note, almond extract for something more delicate, or even a tiny pinch of sea salt to make the sweetness feel more sophisticated. The key is restraint—a few drops of anything extra goes a long way when your cake pops are this small.
Storage and Gifting Genius
These keep beautifully in an airtight container in the fridge for up to five days, which means you can make them ahead without stress or store them after a party without them going stale. I've learned to layer them between parchment paper so the chocolate coatings don't stick to each other, and wrapping them individually in cellophane bags with ribbon makes them look like expensive bakery treats even though you made them at home.
- Room temperature storage works for a day or two, but the fridge keeps them fresher and prevents chocolate from getting sweaty or dull-looking.
- If you're gifting these, a pretty box lined with tissue paper and a handwritten tag transforms them from homemade into legitimately thoughtful presents.
- These freeze surprisingly well for up to two weeks, so you can make a huge batch whenever inspiration strikes and pull them out when you need them.
 Zapisz
 These Pisces-themed cake pops became my go-to when I want to impress people without spending hours in the kitchen—they look like you did, but they taste even better because you actually did. The magic isn't in the complexity; it's in taking something simple and making it shimmer.
Najczęściej zadawane pytania dotyczące przepisów
- → Jak uzyskać efekt galaktyki na kulach?
Użyj różnych barwników spożywczych do stopionej białej czekolady i delikatnie mieszaj kolory, aby stworzyć zamglony, wielobarwny wzór.
- → Jak zapobiec opadaniu kulek podczas dekoracji?
Po uformowaniu kulek, schłodź je minimum godzinę, by nabrały stabilności przed zanurzeniem w czekoladzie.
- → Czy można użyć innych barwników spożywczych?
Tak, ważne by były w żelu lub paście, dzięki czemu barwa będzie intensywna i nie rozrzedzi czekolady.
- → Jak przechowywać gotowe kulki?
Przechowuj je w szczelnym pojemniku w lodówce do 5 dni, aby zachować świeżość i strukturę.
- → Czy można dodać inne dekoracje niż brokat?
Tak, posypki, perły cukrowe lub kształty symbolizujące znak zodiaku dodatkowo ozdobią gotowe kule.